SharePoint Hosted Add-In supports only JavaScript. I was thinking, why can´t we also use ReactJS for that? That is useful to reuse some components for other projects. Furthermore, I would like to deepen the framework ReactJS. I got to know it to use with Visual Studio Code and node.js. Next step I tried to add this to Add-in. Unfortunately, you cannot use ReactJS for Add-in without configuration. I also tried some NuGet packages for ReactJS, but I’m not satisfied with the result. Otherwise, I have to use Node.js.
I would like to show you step by step until I can start to develop it. I’m sure it can be faster if I use Yeoman, but I didn’t try it. Maybe I will do it in the next step.
1. Create new SharePoint Project
Before I install node.js and their packages, first I have to create a SharePoint-Hosted project.
1. Open Visual Studio 2015
2. File –> New –> Project –> Select “App for SharePoint” and type name in field
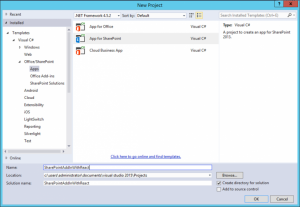
3. Click “OK”
4. Select or enter the URL for SharePoint site
5. Mark “SharePoint-hosted”
6. Click “Next”
7. Select SharePoint 2013 (or SharePoint Online)
8. Click “Finish”
9. Expand “Script” and create new folder “build” (this will be used for “gulp”)
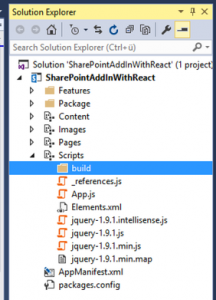
Now save it. Next step I will install node.js and some packages.
2. Install Node.js
If it is your first time working with Node.js, so you have to install this tool on your machine.
- Go to page https://nodejs.org
- Download an MSI-File for Windows
- Install it
- Test it
- Open Node.js command prompt
- Type “node -v”
- The result is “v4.2.0” (or newer)
- Type “npm -v”
- The result is “1.4.28” (or newer)
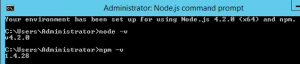
Now the tools are successfully installed. You see, node.js also delivers NPM package.
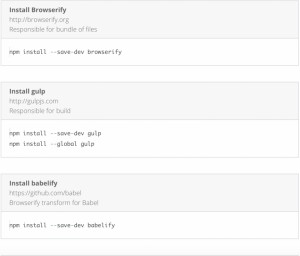
3. Install packages
If you would like to know about the commands, please check here https://docs.npmjs.com/cli/install
- Open node.js command prompt
- Go to SharePoint Project which I created it. (C:\Users\Administrator\Documents\Visual Studio 2015\Projects\SharePointAddInWithReact\SharePointAddInWithReact)

Now all packages are installed for a SharePoint-hosted solution. Next step it needs some small configuration using gulp.
4. Package/Build Configuration
Using node.js command prompt and check If I’m located in the directory (C:\Users\Administrator\Documents\Visual Studio 2015\Projects\SharePointAddInWith
React\SharePointAddInWithReact)

Press enter until this is finished.
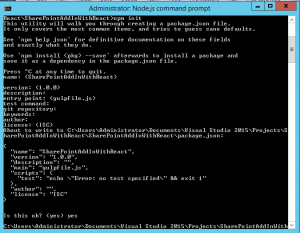
In the code you can see “HelloAddIn.jsx”. It should also be created at Visual Studio. “gulp” will transform it to new js-file “HelloAddIn.js” to the folder “/build”. With this file, it uses for ASPX-Page.
5. Development in Visual Studio
At least I can start to develop. By the way, if you will make these steps very often, it takes less than 5 minutes. 
Ok, unfortunately, I didn’t know, if the JSX-Template is already available in Visual Studio or it was added by NuGet package which I was experimenting.
These steps it is not the best case for the project, but the easy way to use with the react library.
1. Mark on the module “Scripts”
2. Right Click –> Add –> New Item –> Web –> Select “JSX-File” and type “HelloAddIn.jsx”
3. Copy code below
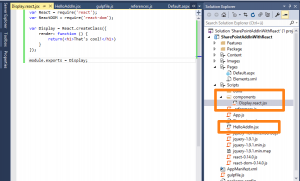
Now you can see a component “Display” is needed. I will create one more file.
4. Create folder “components” on Scripts
5. Add new jsx-file “Display.react.jsx”
6. Copy code below
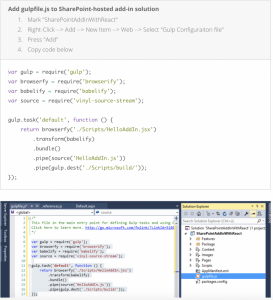
Ok, now I should run “gulp” for creating the js-file. This file I should add to ASPX-Page. These elements should change “DeploymentType” from “ElementFile” to “NoDeployment”
6. Run Gulp
Using node.js command prompt and check If I’m located in the directory (C:\Users\Administrator\Documents\Visual Studio 2015\Projects\SharePointAddInWith
React\SharePointAddInWithReact)


A JavaScript file “HelloAddIn.js” is created in the folder “build”.
7. Add existing JS-File to Visual Studio and Page
These are the last steps before I can deploy the SharePoint add-In.
1. Mark the folder “build” in the Visual Studio
2. Right Click –> Add –> Existing Item –> Go to folder /SharePointAddInWithReact/Scripts/build/
3. Hey…JavaScript file is there: Add “HelloAddIn.js”
4. Go to Pages/Default.aspx
5. Copy code below
8. Deployment
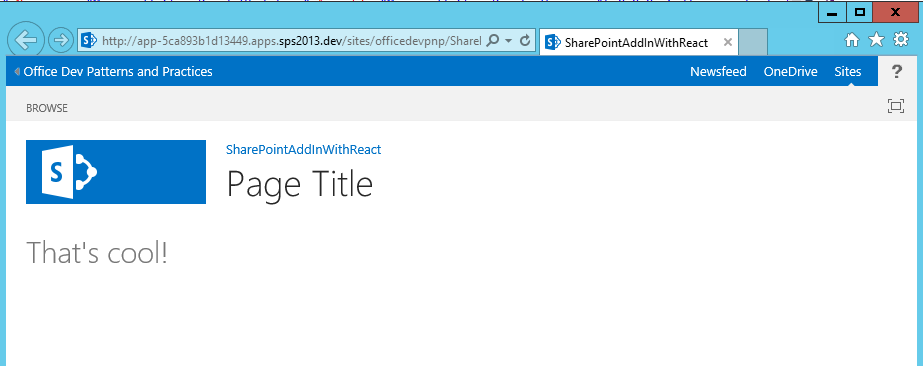
Yeah, now I can deploy it.
Run F5 and here is the result:

Now you can work on existing JSX-files or add more JSX-files. Don’t forget it, before you will deploy it, run “gulp” for update the javascript file.
Summary
That’s cool. It is useful for the maintenance the code in the future or for the development of several developers. Of course, angular.js is also really great library. I cannot wait for using the angular 2.